Triple-Layer Chocolate Mint Squares Delight
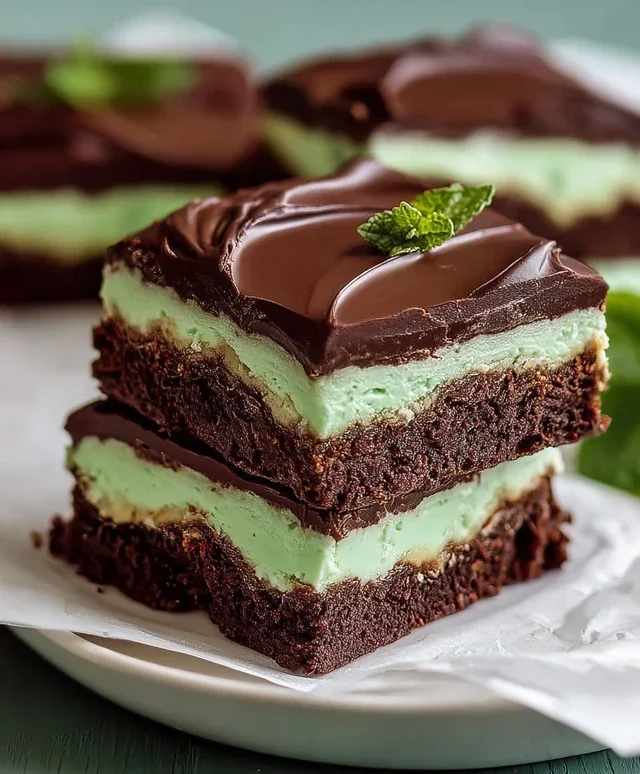
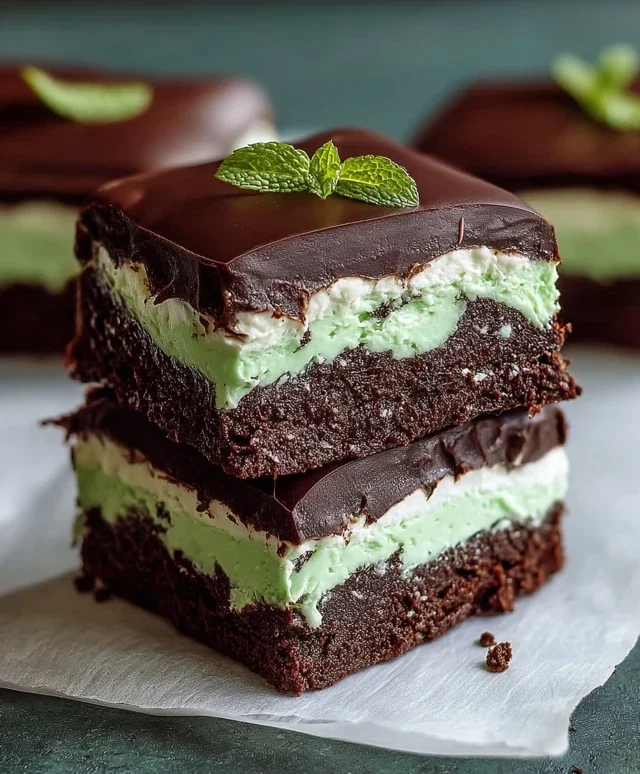
Triple-layer chocolate mint squares are a dream come true for any serious dessert enthusiast, and trust me, they’re about to become your new obsession. Imagin extracte the perfect harmony of rich, dark chocolate, a cool, refreshing minty layer, and a decadent chocolate base, all coming together in a single, irresistible bite. It’s no wonder why these treats are a crowd-pleaser; they hit all the right notes of sweet, creamy, and minty perfection. What truly sets these triple-layer chocolate mint squares apart is the delightful textural contrast, moving from a slightly crum extractbly base to a smooth, melt-in-your-mouth middle and a glossy, intensely chocolatey top. They’re not just a dessert; they’re an experience, and I can’t wait to share how you can create these incredible triple-layer chocolate mint squares in your own kitchen.
Triple-Layer Chocolate Mint Squares
These Triple-Layer Chocolate Mint Squares are a dream for any chocolate and mint lover. Imagin extracte a rich chocolatey base, a creamy, vibrant mint filling, and a smooth chocolate ganache topping – all in one delightful bite. They’re perfect for holidays, parties, or just when you need a serious treat. Making them might seem a little involved with three distinct layers, but trust me, the payoff is absolutely worth it. We’ll break it down step-by-step, and you’ll be amazed at what you can create in your own kitchen.
Ingredients:
Instructions:
Layer 1: The Chocolate Base
First, we need to get our rich chocolate base ready. Preheat your oven to 350 degrees Fahrenheit (175 degrees Celsius) and grease and flour a 9×13 inch baking pan. In a medium saucepan over low heat, melt 1 cup of salted butter with 4 oz. of semi-sweet chocolate chips. Stir constantly until the butter is fully melted and the chocolate is smooth and glossy. Once melted, remove the pan from the heat and stir in 2 cups of granulated sugar and 2 teaspoons of vanilla extract. Make sure everything is well combined. Gradually whisk in 1 ½ cups of all-purpose flour until just combined. Don’t overmix; we want a tender base. Finally, beat in 4 large eggs, one at a time, until the batter is smooth and uniform. The batter will be thick and fudgy, which is exactly what we’re looking for. Pour this glorious chocolate batter into your prepared baking pan and spread it out evenly to cover the bottom. We’ll bake this layer first until it’s set and slightly firm to the touch. This usually takes about 20-25 minutes. Keep an eye on it; we don’t want to overbake it and make it dry. Once it’s done, remove it from the oven and let it cool completely in the pan while we prepare the next layer. This cooling step is crucial to prevent the mint layer from melting into the base.
Layer 2: The Minty Dream Filling
Now for the star of the show – our vibrant minty filling! In a large bowl, cream together ¾ cup of softened salted butter with 3 cups of powdered sugar until light and fluffy. You can use an electric mixer for this; it makes the process much easier and ensures a smoother texture. Gradually add the powdered sugar a cup at a time, scraping down the sides of the bowl as needed. Once you have a smooth buttery mixture, it’s time to add the flavor and color. Stir in 1 tablespoon of heavy whipping cream, 1 teaspoon of peppermint extract, and 10 drops of green food coloring. Mix until the color is evenly distributed and you have a beautiful, bright green filling. The peppermint extract will give it that classic minty punch, and the food coloring makes it look as good as it tastes. Once your chocolate base is completely cooled, carefully spread this mint filling evenly over the top of the chocolate layer. Make sure to get it right to the edges so you have a consistent layer throughout. Gently smooth the surface with a spatula for a neat finish.
Layer 3: The Decadent Chocolate Ganache Topping
The final layer is a luscious chocolate ganache that brings everything together. In a heatproof bowl, combine 3 cups of semi-sweet chocolate chips and 2 tablespoons of butter. Heat ½ cup of heavy whipping cream in a small saucepan over medium heat until it just begin extracts to simmer around the edges. Do not let it boil. Pour the hot cream over the chocolate chips and butter. Let it sit for about 5 minutes without stirring. This allows the heat from the cream to gently melt the chocolate. After the resting period, whisk the mixture gently, starting from the center and working your way outwards, until the ganache is completely smooth and glossy. You want a uniform, luscious texture. If any chocolate chips remain unmelted, you can gently place the bowl over a double boiler (a pot of simmering water, ensuring the bottom of the bowl doesn’t touch the water) for a minute or two, stirring continuously, until everything is melted and smooth. Once your ganache is perfectly smooth, let it cool slightly, for about 10-15 minutes, so it’s spreadable but not too runny. Then, carefully pour and spread the slightly cooled ganache over the mint layer, ensuring it covers the entire surface. Work quickly to get a smooth, even finish.
Chill and Cut
Once all three layers are assembled, cover the baking pan loosely with plastic wrap and refrigerate the squares for at least 2-3 hours, or preferably overnight. This chilling time is essential for the layers to set properly, making it much easier to cut clean squares. When you’re ready to serve, remove the pan from the refrigerator. For the cleanest cuts, run a sharp knife under hot water, wipe it dry, and then cut. Repeat this process between each cut. This will prevent the chocolate from smearing and give you those beautiful, defined layers. Cut the squares into your desired size – I like to make them about 2×2 inches for a perfect bite. These Triple-Layer Chocolate Mint Squares are best served chilled. Enjoy the incredible combination of textures and flavors!
Conclusion:
I hope you’re as excited as I am to dive into making these triple-layer chocolate mint squares! They are truly a showstopper, offering a delightful symphony of rich chocolate, refreshing mint, and satisfying textures. The magic lies in the distinct layers: a fudgy brownie base, a creamy mint filling, and a decadent chocolate ganache topping. This recipe is perfect for birthdays, holidays, or simply when you need an extra special treat. Imagin extracte the smiles you’ll bring with these beauties!
These squares are incredibly versatile. Serve them chilled for a firmer bite, or at room temperature for a softer, more fudgy experience. They pair wonderfully with a scoop of vanilla ice cream or a dusting of cocoa powder. For variations, consider adding a swirl of white chocolate to the ganache or even a sprinkle of crushed peppermint candies on top for an extra festive flair. Don’t be afraid to experiment and make them your own!
I truly encourage you to give this triple-layer chocolate mint squares recipe a try. It’s a rewarding baking project that delivers incredible flavor and visual appeal. You’ll be amazed at how impressive they look, and even more so at how delicious they taste. Happy baking!
Frequently Asked Questions:
Can I make these squares ahead of time?
Absolutely! These triple-layer chocolate mint squares are even better when made a day in advance. This allows the flavors to meld beautifully and the layers to set perfectly. Store them in an airtight container in the refrigerator.
What kind of chocolate should I use?
For the best flavor and texture, I recommend using good quality semi-sweet or dark chocolate for the brownie base and ganache. For the mint layer, milk chocolate can also be a delicious option if you prefer a sweeter profile.
How long do these squares last?
Stored properly in an airtight container in the refrigerator, these triple-layer chocolate mint squares should stay fresh for up to 4-5 days. The minty freshness tends to be most pronounced within the first few days.
Triple-Layer Chocolate Mint Squares
Decadent triple-layer chocolate mint squares featuring a chewy chocolate base, a creamy mint filling, and a rich chocolate ganache topping.
Ingredients
-
1 cup salted butter
-
4 oz. semi-sweet chocolate chips
-
2 cups granulated sugar
-
2 teaspoons vanilla extract
-
1 ½ cups all-purpose flour
-
4 large eggs
-
¾ cup salted butter, softened
-
3 cups powdered sugar
-
1 tablespoon heavy whipping cream
-
1 teaspoon peppermint extract
-
10 drops green food coloring
-
3 cups semi-sweet chocolate chips
-
2 tablespoons butter
-
½ cup heavy whipping cream
Instructions
-
Step 1
Preheat oven to 350°F (175°C). Grease and flour a 9×13 inch baking pan. -
Step 2
In a medium saucepan, melt 1 cup salted butter and 4 oz. semi-sweet chocolate chips over low heat, stirring until smooth. Remove from heat and stir in 2 cups granulated sugar and 2 teaspoons vanilla extract. -
Step 3
Beat in 4 large eggs one at a time. Gradually stir in 1 ½ cups all-purpose flour until just combined. Spread batter evenly into the prepared baking pan. Bake for 20-25 minutes, or until a toothpick inserted into the center comes out with moist crumbs. -
Step 4
While the base cools, prepare the mint layer. In a large bowl, beat ¾ cup softened salted butter until creamy. Gradually add 3 cups powdered sugar, alternating with 1 tablespoon heavy whipping cream, until smooth and spreadable. Stir in 1 teaspoon peppermint extract and 10 drops green food coloring. Spread evenly over the cooled chocolate base. -
Step 5
Prepare the ganache topping. In a small saucepan, melt 3 cups semi-sweet chocolate chips and 2 tablespoons butter with ½ cup heavy whipping cream over low heat, stirring until smooth. Pour evenly over the mint layer. -
Step 6
Refrigerate for at least 1 hour, or until the ganache is firm. Cut into squares to serve.
Important Information
Nutrition Facts (Per Serving)
It is important to consider this information as approximate and not to use it as definitive health advice.
Allergy Information
Please check ingredients for potential allergens and consult a health professional if in doubt.